
Immunofluorescence Staining: Principle, Protocol Workflow, Controls, and Troubleshooting
Immunofluorescence (IF) is an antibody-based fluorescence microscopy technique used to detect and localize specific proteins in cells or tissue sections. Fluorophore-labeled antibodies bind to target antigens, allowing researchers to analyze protein localization, expression patterns, and cellular structures with high spatial resolution.
This guide explains how an immunofluorescence staining works, when to use direct or indirect immunofluorescence, how to perform a typical IF staining workflow, and how to troubleshoot high background, weak signal, or no signal during immunofluorescence assays.
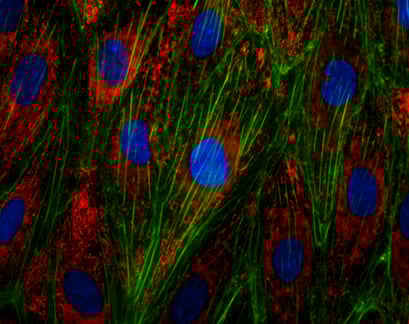
Immunofluorescence staining of the von Willebrand Factor (vWF) in endothelial cells (HUVECs). Actin was stained using phalloidin (green), nuclei were stained with DAPI (blue).
Immunofluorescence at a Glance
- Purpose: Detection and localization of specific proteins in cells or tissue sections.
- Principle: Antibodies bind to target antigens and are visualized using fluorophores.
- Main workflow: Sample preparation, fixation, permeabilization, blocking, antibody incubation, counterstaining, mounting, and microscopy.
- Common problems: High background, weak signal, no signal, autofluorescence, and photobleaching.
- Typical microscopy methods: Widefield fluorescence microscopy and confocal microscopy.
What Is Immunofluorescence? Principle and Applications
Immunofluorescence (IF) is an antibody-based labeling technique used to detect and localize specific proteins in cells or tissues using fluorescent dyes. The labeled proteins are visualized by fluorescence microscopy, enabling high-resolution analysis of protein localization, cellular structures, and expression patterns.
This method combines the specificity of antibodies with the sensitivity of fluorescence detection, making immunofluorescence staining a widely used approach in cell biology, molecular biology, and biomedical research.
Immunofluorescence is based on the following key principles:
- Specific antibodies bind to the protein of interest.
- Fluorescent dyes (fluorophores) are coupled to these antibody complexes.
- The emitted fluorescence signal is detected using fluorescence microscopy to visualize the target protein.
Depending on the experimental design, immunofluorescence enables the analysis of protein localization within subcellular compartments, comparison of expression levels, and simultaneous detection of multiple targets in multicolor staining experiments.
Immunofluorescence is particularly powerful for studying cellular organization, cytoskeletal structures, membrane proteins, and intracellular signaling pathways. The spatial resolution depends on the microscopy technique used, such as widefield microscopy or confocal microscopy.
Because immunofluorescence is highly sensitive to experimental conditions, careful optimization of the staining protocol—including fixation, permeabilization, and antibody selection—is essential for reproducible and reliable results.
Direct vs. Indirect Immunofluorescence
Immunofluorescence staining can be performed using two main approaches: direct immunofluorescence and indirect immunofluorescence. Both methods rely on antibody-based detection of target proteins but differ in how the fluorescent label is introduced.
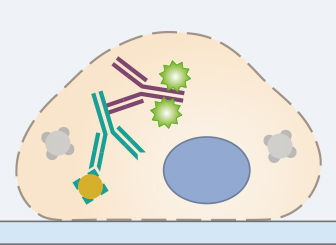
In direct immunofluorescence, the primary antibody is directly conjugated to a fluorophore. This enables a fast and straightforward staining workflow with fewer incubation steps. However, this method is less specific and may result in increased background.
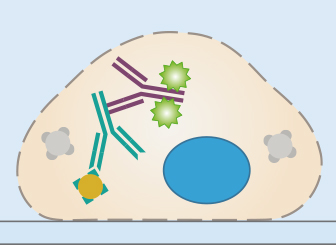
In indirect immunofluorescence, an unlabeled primary antibody binds to the target protein, and a fluorophore-conjugated secondary antibody binds to the primary antibody. This approach is more flexible and is widely used due to its signal amplification and suitability for multicolor staining.
Indirect immunofluorescence is the most commonly used method in cell biology, especially when analyzing multiple proteins in parallel or when higher sensitivity is required.
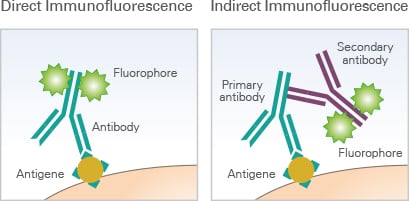
Schematic comparison of direct and indirect immunofluorescence staining. In direct immunofluorescence, the fluorophore is conjugated directly to the primary antibody. In indirect immunofluorescence, a fluorophore-conjugated secondary antibody binds to the primary antibody, enabling signal amplification.
| Feature | Direct Immunofluorescence | Indirect Immunofluorescence |
|---|---|---|
| Labeling strategy | Fluorophore is directly coupled to the primary antibody | Fluorophore is coupled to a secondary antibody that binds to the primary antibody |
| Number of incubation steps | Single antibody incubation | Primary and secondary antibody incubation |
| Protocol duration | Shorter and simpler workflow | Longer workflow due to additional incubation step |
| Signal intensity | Lower signal, no amplification | Higher signal due to amplification by multiple secondary antibodies |
| Flexibility | Limited; each primary antibody must be labeled individually | High; one secondary antibody can be used for multiple primary antibodies |
| Multicolor staining | More limited | Well suited for multicolor immunofluorescence |
| Typical applications | Fast assays and well-characterized targets | General research, low-abundance proteins, and multiplex staining |
Immunofluorescence Staining Protocol: Step-by-Step Workflow
Every immunofluorescence staining protocol consists of four major steps: cultivation, fixation, staining, and imaging. These can be subdivided into the following workflow steps.
- Experiment Planning and Sample Preparation
- Sample Fixation
- Cell Permeabilization
- Blocking
- Primary Antibody Incubation
- Secondary Antibody Incubation
- Counterstaining and Mounting
- Fluorescence Microscopy
Immunofluorescence staining is a very sensitive method that might require troubleshooting. Slight changes in the protocol can lead to different results that are no longer comparable. Therefore, it is very important to precisely maintain the exact same conditions in your specific protocol, such as cell density, antibody dilution, incubation temperature, and incubation time. The following is an overview of the different steps of an indirect immunofluorescence staining protocol.
1. Experiment Planning and Sample Preparation
Before starting an immunostaining, a literature search should be done to determine the expression levels and intracellular localization of the protein of interest in the chosen model system. Some proteins have very low expression, either generally or in certain cell lines. In this case, the expression might have to be induced by external stimuli or overexpression techniques.
Further, the optimal cell density has to be determined. In general, a confluence of 70%–80% is recommended for immunocytochemistry.
In addition, the ideal cell culture vessel geometry and substrate/coating must be determined, and needs to be compatible with the chosen microscopy method. During the whole experiment, it is crucial that the cells never dry out, which should be considered when choosing the appropriate cell culture vessel geometry.
Finally, the number of samples to be stained and analyzed for statistical significance, including the appropriate controls, should be planned in advance. For complex approaches, creating a schematic of the experimental conditions, including the planned stainings—with both positive and negative controls—is recommended.

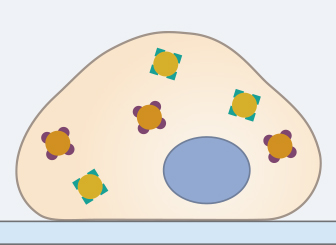
2. Sample Fixation
The first step of an immunofluorescence staining protocol is to fix the sample. The gold standard is fixation using 4% paraformaldehyde (PFA) for 10 min at room temperature. PFA crosslinks proteins and provides a strong preservation of molecular structures. However, PFA can cause autofluorescence and quenching and is hazardous. A very fast fixation can also be achieved with ice-cold methanol via denaturation of proteins. Alcohol can preserve some epitopes even better than PFA but at the same time disrupts cell membranes, making it only suitable for a few protein structures in cells.
Optimal fixation conditions should be determined individually for each experiment. After fixation, it is very important to wash the sample 3x for 5 minutes in a washing solution, e.g., PBS, to remove the fixation solution completely.
3. Cell Permeabilization
To stain intracellular proteins, the cell needs to be permeabilized. Without this step, it is not possible for the antibodies to enter the cell through the lipid membrane. The permeabilization requires incubation in a detergent, for example Triton X-100 or Tween-20 (for a less harsh permeabilization) in a PBS solution.
This step must be optimized depending on the protein of interest, the used antibody, and the experimental conditions. Especially when staining membrane proteins, the permeabilization step has to be done with caution, because Triton X-100 can disrupt the cell membrane. In this case, using saponin might be an alternative to classic detergents. Note that methanol-fixed samples are already permeabilized, since alcohols easily wash out the lipids of the cell membrane.
After this step, the sample has to be washed 3x for 5 minutes in a washing solution.

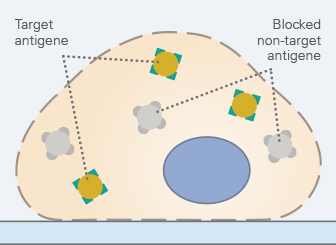
4. Blocking
To minimize intra- or extracellular background signals caused by unwanted binding of the antibodies, non-specific antigens should be blocked by incubating the sample in (1) the serum of the host, in which the secondary antibody was raised or generated (for a very specific blocking), (2) bovine serum albumin (BSA), or (3) milk (for general blocking in standard protocols).
Typical blocking times range from 30 minutes to one hour. Excessively long blocking steps should be avoided, as this can reduce the specific binding of the primary antibody, and therefore reduce the signal.
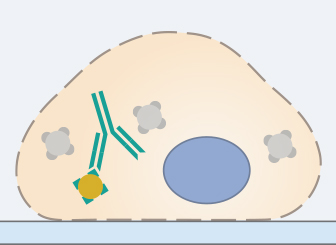
5. Primary Antibody Incubation
The selection of the primary antibody and its incubation conditions is the most critical step of an immunofluorescence staining protocol. A suitable monoclonal or polyclonal primary antibody must have a high specificity for the antigen of interest.
A key fact that is often confused in the lab: The primary antibody’s binding specificity must match the target epitope, but its host species should not match the sample species (e.g., for mouse cells you can use a rabbit anti-mouse antibody, which binds mouse antigens and was raised in rabbit). Another crucial property of the primary antibody is its host species, as it determines the choice of secondary antibody. This distinction is particularly important for multicolor stainings: using primary antibodies from different host species allows the application of distinct secondary antibodies and avoids cross-reactivity.
The optimal incubation conditions and antibody dilution must be determined carefully for each experiment. Antibody concentrations that are too high and incubation times that are too long can result in a non-specific background signal. Conversely, concentrations that are too low and incubation times that are too short can lead to a very weak or missing signal.
After incubation with the primary antibody, the samples should be washed 3x for 5 minutes in a washing solution in order to avoid background fluorescence.
6. Secondary Antibody Incubation
In standard immunofluorescence assays, the secondary antibody is conjugated to a fluorophore, which emits light when excited at a defined wavelength. It specifically binds to the primary antibody. Therefore, it is essential that the secondary antibody is specific to the host, in which the primary antibody was produced (e.g., use goat anti-rabbit as a secondary for rabbit anti-mouse primary). Also, the chosen microscopy setup (filters, lasers, cameras, and detectors) must be compatible with the chosen fluorescence dye.
Stable fluorophores must be used, because the sample is generally exposed to a high number of photons during fluorescence microscopy. Also, fluorophore brightness should be taken into account, because the antigen with the highest expression level should be detected with the fluorophore with the lowest brightness. When doing a multicolor staining, the spectral overlap of the conjugated fluorophores should be carefully considered as well. Respective tables can be found on the manufacturers’ websites.
The incubation in the secondary antibody solution should be carried out according to the manufacturer’s protocol. Since fluorophores are sensitive to light, all following steps of the protocol need to be carried out in the dark. In order to avoid background fluorescence, the samples should be washed 3x for 5 minutes in a washing solution after incubation with the secondary antibody.
What Is a Fluorophore?
A fluorophore (or fluorochrome) is a chemical or molecular structure capable of absorbing light at a specific wavelength and emitting fluorescence at a longer wavelength. Fluorophores are widely used in microscopy to visualize specific structures, either as synthetic organic dyes (e.g., fluorescein/FITC, rhodamine, Alexa Fluor dyes) or as genetically encoded fluorescent proteins such as green fluorescent protein (GFP), red fluorescent protein (RFP), and yellow fluorescent protein (YFP).
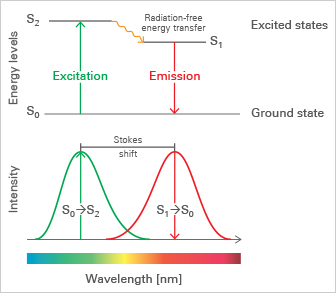
Fluorophores are excited when they absorb light of a certain wavelength and then re-emit light at a longer wavelength through fluorescence. Light absorption excites the fluorophore from the ground state (S0) to an energy-rich excited state (S2 or S1). These excitation states are not stable and quickly undergo relaxation processes. First, excited fluorophores rapidly relax to the lowest energy level of S1 through non-radiating processes, known as internal conversion. This energy-consumptive process is generally complete prior to light re-emission, causing the re-emitted light to be of lower energy and, therefore, of a longer wavelength than the absorbed light. This effect is known as the Stokes shift. Re-emission of Stokes-shifted light at a longer wavelength, known as fluorescence, finally relaxes the fluorophore back to its ground state S0.
7. Counterstaining and Mounting
The final steps before microscopy are the counterstaining of the nuclei (optional) and the mounting. In order to avoid drying out of the samples and to guarantee a stable refractive index of the cellular environment, which is a prerequisite for successful microscopy, the sample needs to be mounted.
For this, the sample should be covered with a mounting medium that has low autofluorescence. DAPI, the standard for nuclear counterstaining, is either included in the mounting medium or can be added separately.
8. Fluorescence Microscopy
To get optimal results, the microscopy analysis of the immunofluorescence staining should be done directly after mounting.
Many microscopy techniques exist, each optimized for different experimental approaches. For standard immunofluorescence stainings, widefield fluorescence and confocal microscopy are widely used methods. All parameters such as magnification and exposure should be carefully and individually determined.
Explore a detailed overview of the different microscopy techniques and their applications.

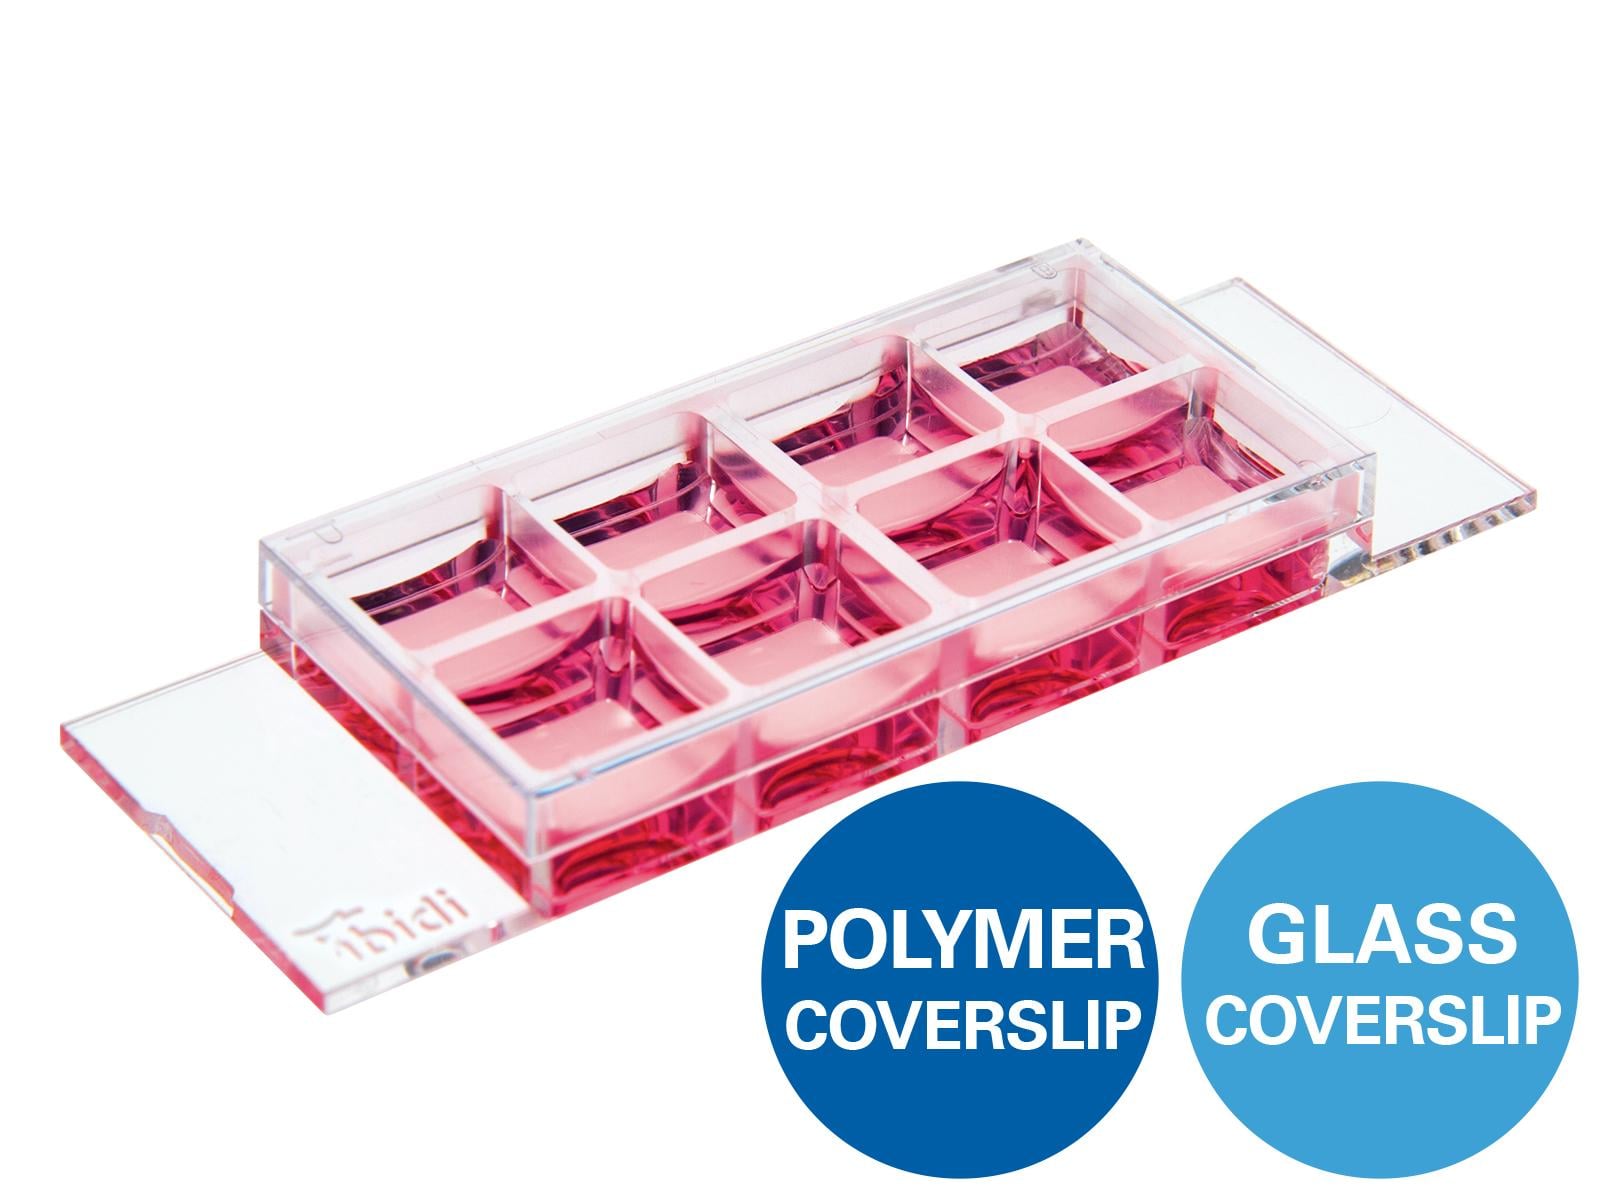
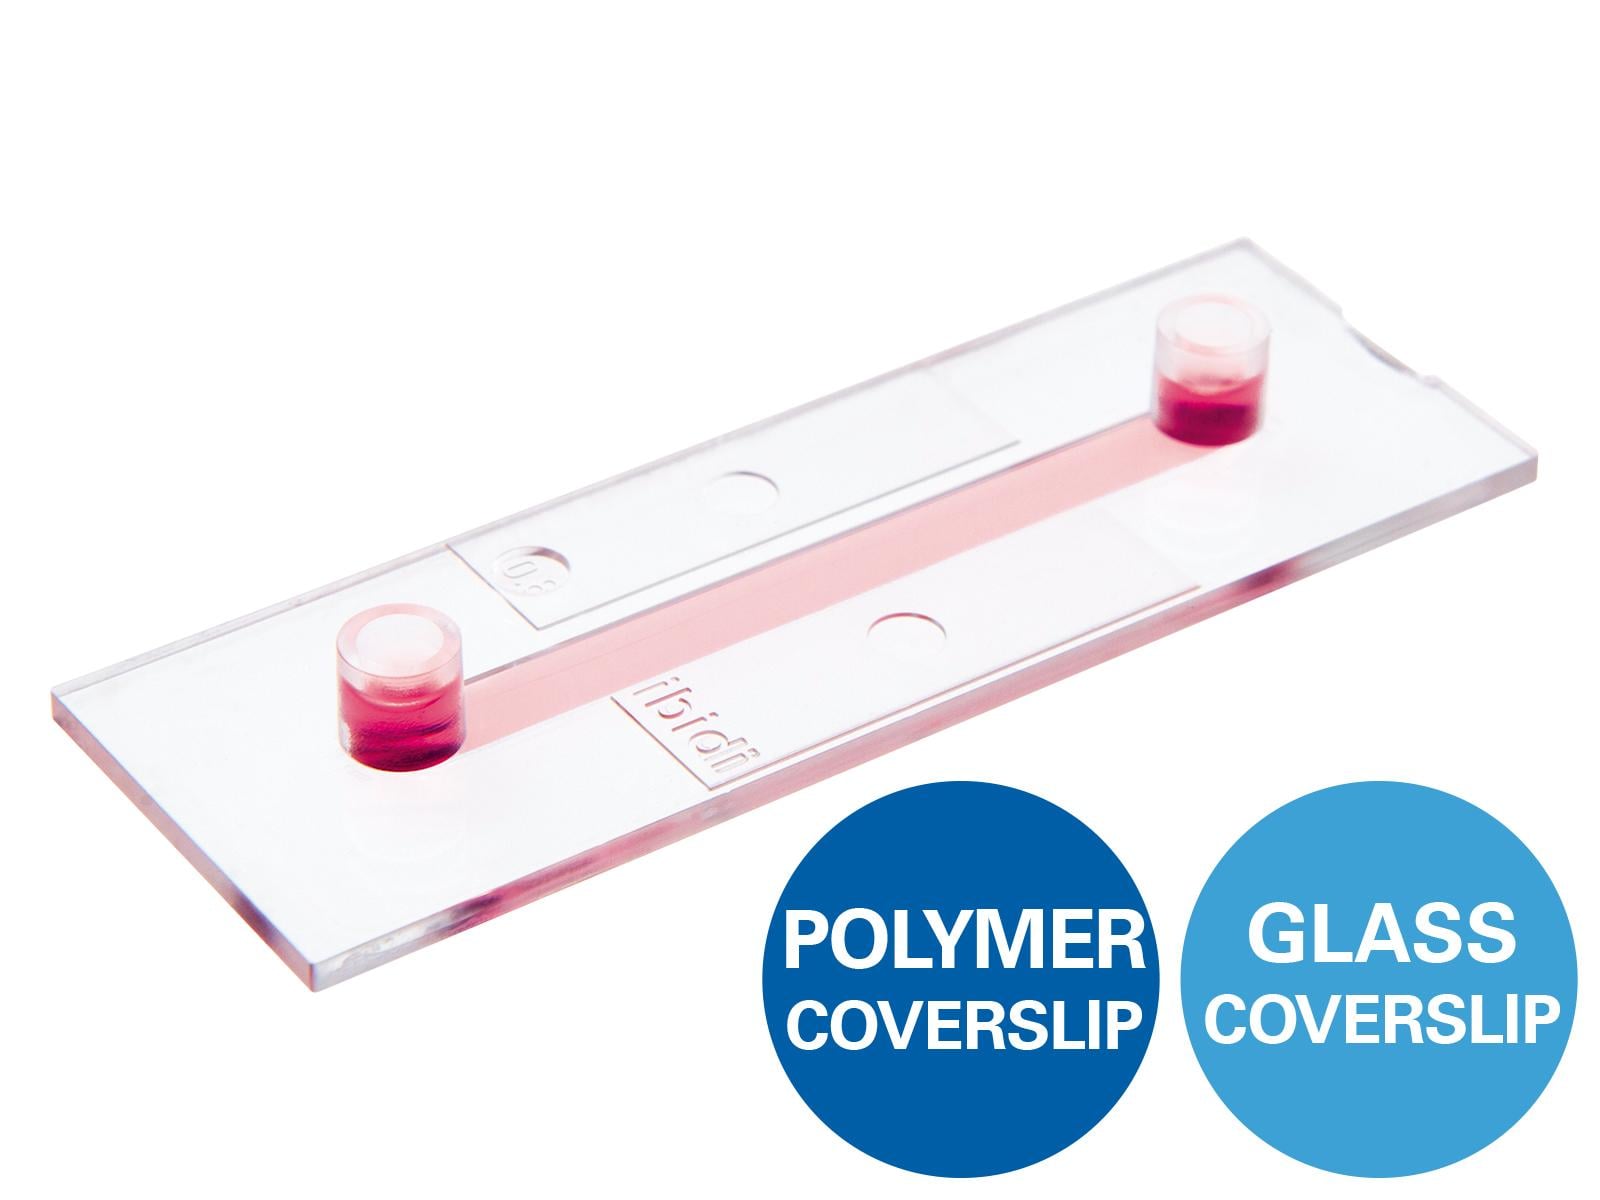
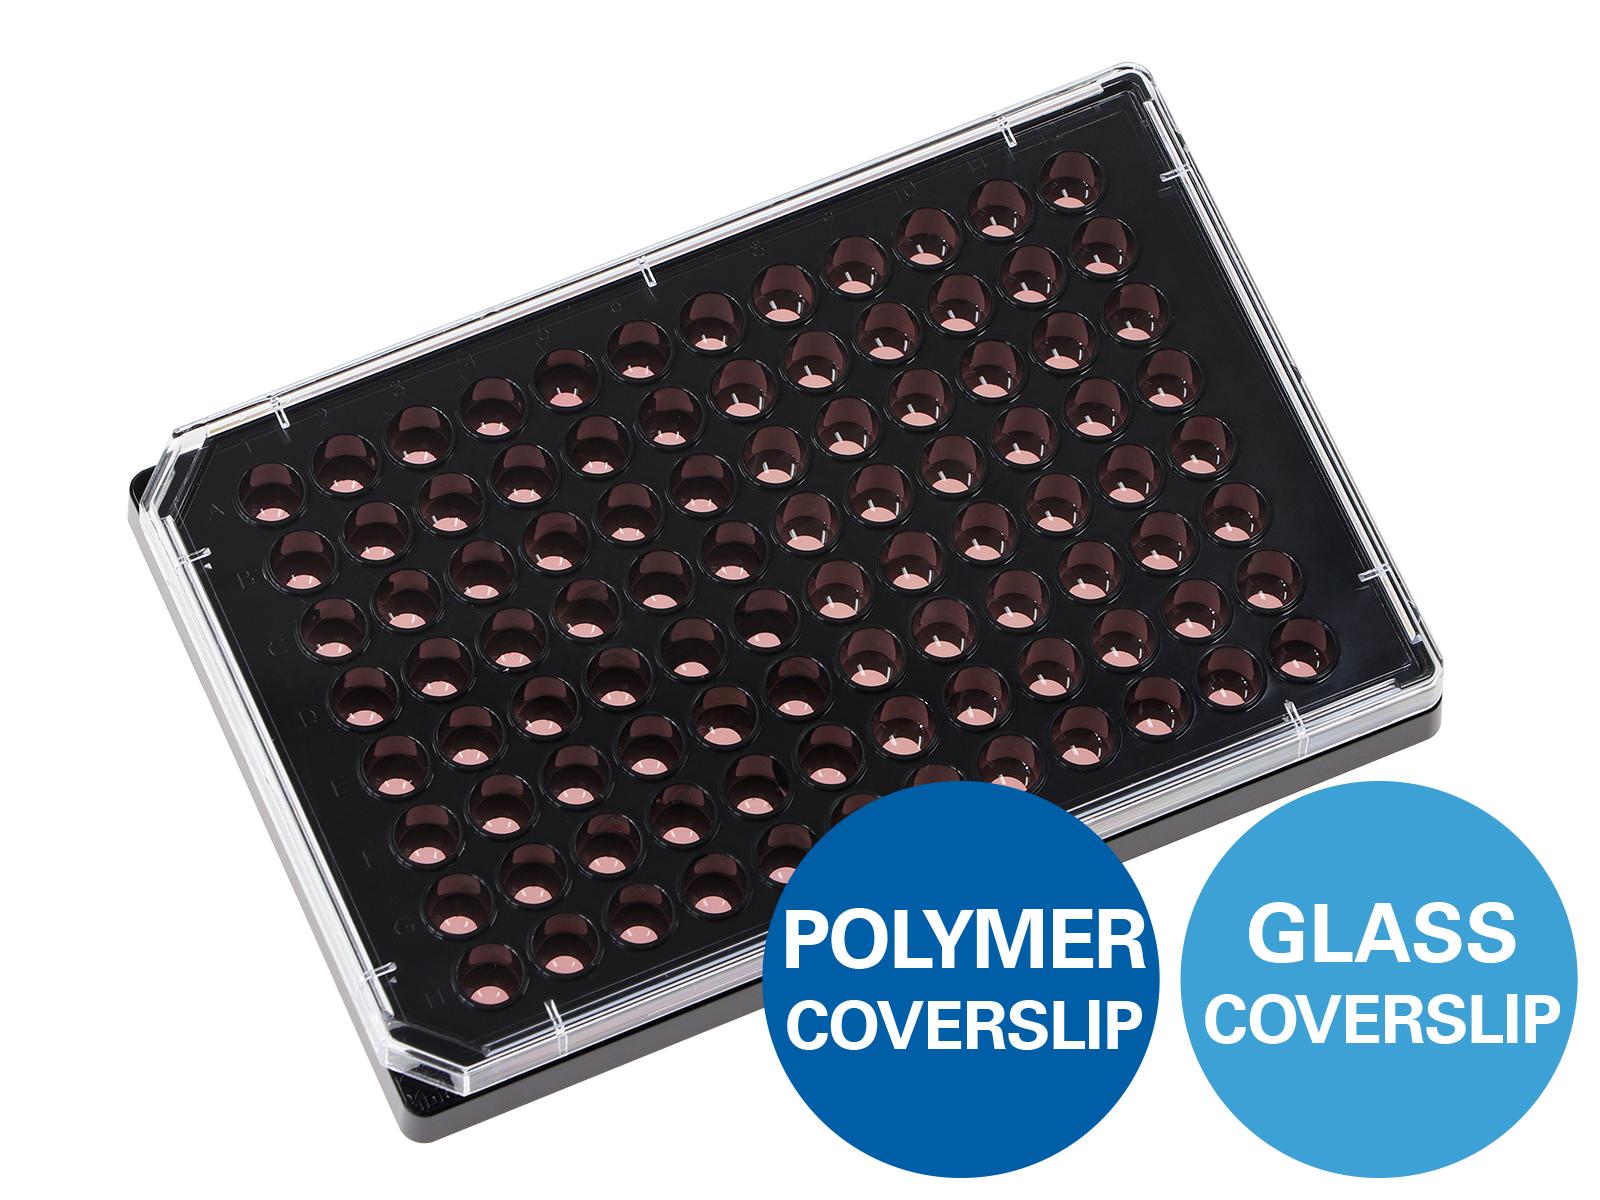
ibidi Labware and Mounting Medium for Immunofluorescence
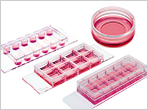
The choice of labware can influence handling, reagent consumption, image quality, and sample storage. ibidi µ-Slides and µ-Dishes with a coverslip bottom are suitable for inverted microscopy and allow immunofluorescence staining directly in the slides or dishes. The geometry of ibidi Channel Slides supports the exact exchange of small medium amounts, and ibidi Chamber Slides, removable are suitable for long-term storage of mounted samples.
For fixation compatibility, please refer to the chemical compatibility table. For mounting, the ibidi Mounting Medium and the ibidi Mounting Medium With DAPI have very low autofluorescence, prevent photobleaching, and allow the sample to be stored for several weeks on the µ-Slide without the need for additional coverslips.
Recommended Immunofluorescence Controls
Appropriate controls are essential for distinguishing specific antibody signals from background or non-specific binding and should be included before troubleshooting, to identify the source of any issues.
| Control | Purpose | Method |
|---|---|---|
| Unstained control | Assesses sample autofluorescence and background signal from the cells, labware, fixation method, or mounting medium. | Perform the complete workflow, but replace the primary and secondary antibody solutions with antibody dilution buffer. |
| Secondary-only control (no primary antibody) | Detects non-specific binding or cross-reactivity of the secondary antibody. | Perform the complete workflow, but replace the primary antibody solution with antibody dilution buffer. |
| Positive control | Confirms that the antibody and staining conditions can detect the target antigen. | Use a sample known to express the target protein under the chosen experimental conditions. |
| Negative control | Helps verify staining specificity, for example using a knockout, knockdown, or non-expressing sample. | Use a sample lacking the target antigen, such as a knockout cell line, knockdown condition, or non-expressing tissue. |
| Isotype control | Detects non-specific binding of the primary antibody, especially in complex staining conditions. | Replace the primary antibody with a non-specific immunoglobulin of the same isotype, subclass, host species, and concentration (e.g., IgG1, IgM). |
Immunofluorescence Troubleshooting
Immunocytochemistry is a very sensitive method that requires experience and optimization. Slight changes in the protocol can markedly alter the results. If you get a low signal, no signal, or a high background, please consult the following troubleshooting guide.
High Background in Immunofluorescence
| Possible Reason | Recommended Solution |
|---|---|
| Inappropriate or too long fixation, leading to artifacts | Reduce fixation time or change the fixative. Always use freshly prepared fixation reagent. |
| Insufficient blocking | Prolong the incubation time, consider using a different blocking solution (e.g., serum from the secondary antibody host). |
| No specificity of the primary antibody | Use a primary antibody that is proven to work for immunofluorescence in the chosen model system; if available, use a knockdown/knockout sample as a negative control. |
| Too high primary/secondary antibody concentration, too long incubation time, too high incubation temperature | Optimize the antibody concentration and incubation time/temperature, consult the manufacturer’s protocol. |
| Cross-reactivity of the secondary antibody | Use a secondary-only control to check for non-specific binding or cross-reactivity of the secondary antibody. |
| Not enough washing | Verify that all washing steps are carried out properly; if necessary, prolong the washing steps. |
| Low signal intensity, resulting in noise | Optimize the signal-to-noise ratio, e.g., by using a brighter fluorophore for detection; if applicable, increase the expression of the antigen of interest (e.g., by overexpression or by addition of inducing agents). |
| High autofluorescence | Check the sample autofluorescence by using unstained controls; use fresh fixation solutions (expired formalin solutions might have high autofluorescence); use materials with low autofluorescence (e.g., ibidi µ-Slides or Chamber Slides); use mounting medium with low autofluorescence (e.g., ibidi Mounting Medium / ibidi Mounting Medium With DAPI). |
Weak or No Immunofluorescence Signal
| Possible Reason | Recommended Solution |
|---|---|
| Drying out of the sample | Always keep the sample moist. |
| Overfixation of the sample, leading to epitope damage | Reduce fixation time or change the fixative. |
| Inadequate permeabilization method | Optimize or skip the permeabilization step. |
| No binding of primary antibody to the antigen of interest | Use a primary antibody that is proven to work for immunofluorescence in the chosen model system; check the antibody functionality by using a positive control (e.g., by overexpression or by addition of inducing agents). |
| Too high primary/secondary antibody dilution, too short incubation time, too low incubation temperature | Increase the antibody concentration or the incubation time/temperature; consult the manufacturer’s protocol. |
| Very low or no antigen expression | Use a positive control (e.g., an overexpression model); reconsider your experimental system. |
| Bleaching during imaging | Use a secondary antibody conjugated to a fluorophore suitable for your chosen microscopy technique. |
| Inappropriate microscopy detection method | Use a more sensitive method for image acquisition; check your filter/laser setup; use a brighter fluorophore. |
Immunofluorescence FAQ
What is immunofluorescence used for?
Immunofluorescence is used to detect specific proteins in cells or tissues and to analyze their localization, expression, and distribution using fluorescence microscopy.
What are the main steps of an immunofluorescence staining protocol?
The main steps are fixation, permeabilization, blocking, primary antibody incubation, secondary antibody incubation, counterstaining, mounting, and microscopy.
Why is my immunofluorescence background signal high?
High background can be caused by insufficient blocking, non-specific antibody binding, antibody concentrations that are too high, incomplete washing, autofluorescence, or unsuitable fixation conditions.
Why is my immunofluorescence signal weak or missing?
A weak or missing signal can result from overfixation, low antigen expression, insufficient antibody binding, inappropriate permeabilization, drying of the sample, or unsuitable microscopy settings.
Which microscopy techniques are commonly used for immunofluorescence?
Standard immunofluorescence samples are commonly analyzed using widefield fluorescence microscopy or confocal microscopy, depending on the sample type, required resolution, and signal distribution.